Sunday, January 03, 2016

My Fibaro controlled alarm (Part 3) - The End Game

So, this has taken a very, very long time to get to a finished state! Apart from work getting in the way, a number of things just just seemed to stop making this work.

  • Firstly, around the beginning of 2015 Fibaro updated to the version 4 software.  I really hoped that what was included would make this process easier, but unfortunately I ended up with a number of bugs and it has taken ages for these to be worked out and stabilised.  As at version 4.056, I have had stability for what I need and it's working much better (for my alarm purposes at least!)
  • Second, my wife just couldn't get along with this whole process and it was just too difficult for her to enable. She has been used to traditional ways for alarms to work with a keypad and arming sound.
  • Third, the mobile apps have been just as problematic with functions not working as expected and with little to no documentation.
  • Lastly, I tried with various levels of Lua code to fix the problems I was having.  This really didn't help much and actually sometimes made it worse!

There have also been a number of other posts on the forums with ideas as well as a number of bloggs written in the past year.  I have taken ideas from many of these, or at least tried some parts but most just didn't fit what I was after:
Actually my final setup hasn't gone into LUA code, which I had actually thought would have to happen.  I have more or less just progressed with the existing setup that I had in Part 2.  As a summary:
  1. I have kept with the Everspring Siren as it was, I have still not resolved the lighting issue.
  2. I actually now have significantly reduced the number of scenes that had been created previously and starting to use the now functioning default alarm settings!
So to get my wife to actually realise that the alarm is on and therefore know that it needs to be disarmed, I looked at various options including sending audible notifications (by using pushover) to her phone or to the iPad 2, which is now mounted next to the front door.  Pushover is great, though technical, forum post with details here.  
I actually settled for the moment on a simpler solution which just uses 2 devices, first changing the front door to a second delay for disarming (with the rest the same as the other enabled motion sensors detailed later).


What this does is trigger an alarm response using the "Emergency Lights" section in the Alarm panel.


Using the Emergency Lights to "switch selected lights to emergency mode" which actually flashes the entrance hall light on and off!  This gets the response needed telling whoever that has entered to disable the alarm.  NOTE: This could actually also be used to switch the siren off as when you disarm this is then disables and the lights return to normal. (again this only works in later versions of the software and didn't in the past - detailed this previously as Issue 3 in Part 2!)

The next step, needed more because of not using the emergency mode for the siren, was to create a single scene to actually turn the siren off.  When creating, the "Do not allow alarm to stop scene while while alarm is running" is checked as this is now (finally!) working so this scene runs regardless if the alarm is tripped. (detailed previously as Issue 1 in Part 2)


The scene itself is rather simple and does the following:
  1. The main IF statement checks to see that the siren is on!
  2. It then checks all the motion detectors that are enabled for alarm use to see if they have been disarmed, and does the same for the front door sensor.
  3. If these have been disarmed, it switches the siren off!

Next step was similar to Part 2 were only the sensors that are to be used are enabled, all others had the section "Sensor is excluded from the alarm system" enabled.  For each of the motion sensors had similar arming and disarming delays (my case 30s) with a force state after a further 30s.


Back to the Alarm panel, at the moment only two other areas are enabled.  The Panic state which has the siren as the only selection with a 45 second delay.  So if the alarm is not disabled within 45 seconds then it switches the siren on.


Then a notification as before which goes to my phone.


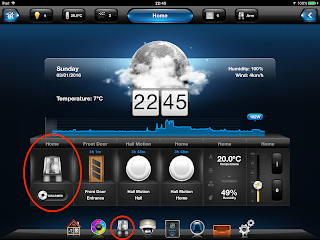
Lastly is the arming of the alarm.  With the latest tablet apps this is WAY easier!! Either just enabled directly from the home screen with the alarm tile (large highlight in the image) or better still to use the alarm panel (smaller highlight taking to second image below) as this allows a history of the alarms being enabled plus the status of the alarm panel areas that have been enabled.


The arming panel now works (didn't work well at all before) with a full PIN code entry to enable the alarms.  Same with the disarming, and now this disarms ALL of the sensors (issue I detailed previously as Issue 2 in Part 2)


Finally, success - an armed alarm and actually using functions within the software rather than having to find workarounds!


A few next steps that I am going to look at:
  • Getting Pushover to work well, with audible notifications
  • Location based arming and disarming, the mobile apps are awful to date in this regard so looking at other options
  • Possibly using the ZipaBox RFID Keypad and tags to arm / disarm
  • Adding camera's to the setup
  • General error checking and maturing the solution!


Thursday, June 12, 2014

Controlling Lights with sensors (the Basic way)

So after some experimentation, I realised (probably one of those Read The F... Manual times...;-) ) that using scenes with blocks was not the most basic way of setting up and controlling my lighting!  Understanding the basic ideas behind association is one thing, but realising some of the control that can be had with some of the other settings/parameters is important.

So the basic idea, to control the lights in my hall, bringing them on when the motion sensor was breached but only when actually needed.

Basic Association
For starters, I associated the sensor to the lights (both Fibaro sensors in this case...will try with others when I get some!).  In the advanced Tab of the sensor, in the Associations section, I used Group ID 1 (in image below click the Set Up) and chose the Hall lights from the list.  One thing confused me here...the number that appears does not seem to be the device ID!? (does anyone know? Please tell in comments if you do)


With this done the sensor needs the configuration to be added to the actual sensor as it's a battery device, which after some experimentation this needs to be done TWICE! So remove the sensor and bring it close to the HC2, open the case and triple click the button...and once this is done (and the blue light goes out on the sensor and the flicking one on the HC2), do it again.  Do yourself a favour and have the web interface open as there is a prompt after the first wake up in the logging window that actually says to wake the device again (in yellow text).  To check that this is correct, when refreshing the parameters (on Advanced Tab > Reload parameters) the "View" section will only show 1 (or any previous associations) until the second wakeup is performed. I got this wrong and wondered why things didn't work.

When to switch on the lights
There are 3 parameters that are important as you don't necessarily (well I didn't) want the lights to come on during the day.  Going back to front....first there is Parameter 9, which controls the light intensity.  This is set to 200 Lux by default which I found far to high for my Hall (and my eyes!)  This will need some experimentation to understand at what level of natural light you need to have the lights on for and is related to the activities of that space.


Then onto Parameter 8 which controls when the light will come on...and this is not time of day like it suggests.  From what I can gather, when the light drops below the default 200 lux (or whatever you have determined to be that level as part of parameter 9 above...in my case 50 lux) it determines that as it's "night".  This one I am going to experiment with a little more to see if my assumptions are actually correct. (again, comments if you think I am wrong please!)


Then the last parameter, in descending numerical order...(although I have no idea where 7 went to) we get to Parameter 6.  This basically tells you how long the light will stay on for if there are no other sensor breaches...in my case this is 180 seconds (3 minutes).  This is a sliding window of time as if there is a breach within that time the windows resets itself.


And that's it...now if the lux level is below the 50 lux and the sensor is breached, we have lights for 3 minutes (unless someone moves!).  The other great thing, if the controller is off / rebooting etc. this will continue to work as associations are between the devices.

On a side note...I really do love these highly descriptive and logical "Parameter x" values.  I'm sure they could have been named something a little more descriptive and understandable, like "Light Intensity" or "Time that Light stays on"!


Sunday, June 08, 2014

My Fibaro controlled alarm (Part 2) - The Setup (Scenes)

So this is what I have setup so far to get a working alarm.  Important, as I have said previously, I didn't want to use LUA code in this, just wanted to use blocks and variables.  I am sure there are a number of ways to do this, this is what I came up with.  I have decided to share as I haven't seen anything comprehensive (even if wrong).  If you know of other ways or think I have got this completely wrong, please let me know in the comments or on the Fibaro forum.

Firstly, as I have an Everspring siren this is just seen as a switch.  Once getting this included I changed the controlled device from "Other device" to "Lighting".  A major issue with this is if you switch on all your lights at home...the alarm will sound!!  I am going to play with the other device types and will update this if/when I find another way.


Second, I started doing this with the idea that I would use scenes to control the arming and disarming of the alarm.  The idea was that I would control both with a ZWave.me key-fob, button 1 for arming and button 2 for disarming.  Thanks for this blog for showing how to setup the key-fob which I am not going through.  But the Key-fob is just the interface, all my testing was actually done from my Android phone running the scenes.

Arming Scene
These are the scenes that I have setup, for Arming the alarm:


Essentially, I checked on something that I could completely control...in this case the front door being closed, and then armed all my devices from that sending a push message to my phone. Also, for arming I didn't want to be putting in PIN codes as I would be using a key-fob.

Disarming Scene
This was basically the reverse!

Although I added a turn-off of the siren in case it was sounding but this has been a waste and doesn't work, I will remove it in part 3!

Controlling device sensors
Then to control the timing of the motion control devices and / or windows/door sensors, I wanted to add time to get out of the house and be out in enough time that I didn't get exceptions while arming.  I did this by adding a 45sec delay to the arming of the device. (initially this was 30sec but I have since extended it)

The same for when I wanted to disarm, I added a disarming delay which essentially allows you to walk into the house and for the alarm to not be in a "breached state" for the 30 seconds.


Siren
Next, the sounding of the siren.  So initially, as the siren is now seen as "lighting" I added the device to the alarm panel with a 30 sec delay (same as per disarming above) and also added a notification to send me a push message if the alarm was sounding.


Testing and issues
I have run some tests to see how this will all work and come across some issues, but essentially it does actually work.  Running the script starts off the sequence, and by going to the devices section (or in the Android app) there will be a countdown for each of the sensors.  Once this reaches zero, the sensors should all arm, and the alarm panel will report that the alarm is armed.

Devices Arming Countdown
Devices Armed
Alarm Panel
Disarming, same process by running the disarming scene...but be quick.  If you aren't quick I found that it would timeout and not disarm!

Now onto some of the issues and why I have actually started to move to a mix of scenes and other interfaces.

Issue 1 - Then, disarming the alarm with the disarming scene when it is sounding gives me an "access denied" (and with the key-fob obviously no feedback and the alarm still sounding!!) as running of scenes is disabled during the alarm sounding EVEN when the setting "Do not allow alarm to stop scene while alarm is running" is checked.  I cannot find why this is the case, but this seems to be a bug.

Issue 2 - When the alarm is sounding, from the mobile app as I can't use the scene I used the alarm panel on Android, it only deactivates THE SENSOR THAT IS BREACHED...all other sensors stay active.  I can see this as being a feature as you want the house to continue to be armed if one room is breached so that the alarm will sound again but I was not aware and it caused me issues, plus makes switching off the siren more difficult.

Issue 3 - When breached the siren will sound and even if the sensor is deactivated/disarmed and it will continue to sound.  There is no stopping these as part of the disarm process within HC2, and the feedback from Fibaro support was "sorry action on disarm is still not implemented".  To disarm you either have to switch it off manually (which is what I did initially) or write a scene that works to check (in part 3)

Issue 4 - Phone notifications, they sometimes arrive and sometimes not (on Android that is) so don't rely on them at all.

Other ways of arming
Then came the realisation that I really needed a device, at the entrance door (or centrally placed) to be able to arm and disarm.  The key-fob was an initial idea but with the problems with scenes not running with alarms properly it means I had to fumble with my phone or run up to the PC to get the siren off and the alarm disarmed....not something that my wife would put up with. ;-)

With that I decided to use an iPad 2 that I have around the house, mounted on the wall to control my home automation and the alarm.  This also came with the realisation that the iPad app is far easier to use (Android Alpha version is not really there at the moment) than my phone or the key-fob.  Seems expensive but it was an option that I have...and I will explain the changes in part 3.


Saturday, June 07, 2014

My Fibaro controlled alarm (Part 1) - The Issues

One of my first things that I wanted to achieve with my foray into Home Automation, was to get an alarm system that was setup and could compare to what I had been quoted for by existing alarm suppliers.  I had already decided on using z-wave technologies, and probably the Fibaro HC/HC2 centre with various other z-wave sensors (The reasons for using zwave technologies and Fibaro, I will cover in another post)

So for me the basics had to be:
  1. Motion controllers for the specific rooms that I need to protect
  2. Door/Window sensors again for those areas
  3. A working siren as part of the alarm
  4. A way to arm / disarm that was as simple but secure, that could be worked by both my wife and son.  This need to be portable or keypad based.
Importantly, I wanted to start basic, so no location based features etc.

I had decided on using the Fibaro HC2 centre as I felt long term I may need to use the LUA scripting but initially I didn't want to and, although at almost double the price, didn't want to be caught out either.

In discussing what I wanted to achieve, I spoke to my suppliers (Vesternet, who have been great so far!) and came up with a list of components which included the HC2, motion controllers, window/door sensors, a siren (Everspring SE812)  and a key-fob for easy arming/disarming.  I installed the motion controllers and window/door sensors, added the siren and key-fob to the HC2 and went about trying to get these all working together...ah, not so easy.

The issues that I have come across:

Where is the Alarm?
There is no "Alarm function in HC2" - Yes there is an "Alarm Panel" that allows you to start piecing things together but don't be fooled, it's far from complete (in my humble view or misjudge experience to date!).
There are things that can be started, but they cannot be stopped (like a siren...see next point).  The answer that I got on the forums was "sorry action on disarm is still not implemented". Huh?!

Siren
A siren is not an alarm - this may just be my simplistic (or ridiculously stupid) view of the world, but understanding that a siren is not the central part of an alarm was important to me and a bit of a "doh" moment.  All it is, is noise! and a switch, on and off...that's it.  Treat is as such, and use a light as a test! (so that you don't end up a bad neighbour)

Dogs and motion..(and believing promotional video's!)
Sensors and dogs, even small ones, make life very challenging.  One of the reasons for choosing the Fibaro sensors was a promotional video (how stupid can I be, right??!).  Look at this video at position 1:09 "Intelligent object recognition allows to distinguish a small pet from a person"
Um, no.  The support I got was "Please modificate parametr 1."  Parameter 1 is the sensitivity of the motion controller...there is no intelligence at all involved, and pets don't perform well to different sensitivity parameters...actually neither does the postman. (post falling through a letter box, as an example!)

Dead nodes
Why does that device have a big cross through it!?
Yes, this is no "Apple" system that just works.  Technically you need to get to understand why things can't communicate properly and why they may not be able to be controlled.  This is far from a "man in the street" or the non-technical wife/husband system to use because it just works.  Today it needs care, love and attention, all of which will hold it back.

Updating devices
This is easy with devices that are not battery controlled, you just change a parameter save and...update.  Not so easy for battery controlled though!  When battling the dog issues above (and postman) I have to resort to:
Change parameter...hit reconfigure device (and save for good measure), get device (from the location where I got it just right for detecting me) and move it close to the HC2, open and triple click and check that it updates in the interface, down to room and put back up (and try and get location correct!), then test...and it doesn't work.  
Feels a bit like I also need to rub my tummy in a clockwise directions while standing on one leg, all the time while not breathing out...!

Script blocks
Sounds good, actually even looks good as well...but, I think it should be renamed to "very simple blocks" as they only really allow very limited functionality.  But I have, I believe, eventually been able to put together a working alarm out of the simple blocks...no LUA code (as yet)

So, in part 2...how I put my alarm together and what I did do to overcome some of the issues above.